ICubBrain: Difference between revisions
m (update links) |
m (simplify page) |
||
| (8 intermediate revisions by the same user not shown) | |||
| Line 1: | Line 1: | ||
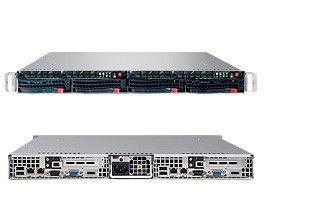
[[File:SYS-6015TW-INFB.jpg|frame|right|caption|Front and rear view of iCubBrain rack.]] | [[File:SYS-6015TW-INFB.jpg|frame|right|caption|Front and rear view of iCubBrain rack.]] | ||
iCubBrain is a cluster of 2 machines used by VisLab to run the computation behind stable robot '''demos''' | iCubBrain is a cluster of 2 machines used by VisLab to run the computation behind stable robot '''demos'''. | ||
''Old information can be consulted at [[iCubBrain/Archive]].'' | ''Old information can be consulted at [[iCubBrain/Archive]].'' | ||
| Line 11: | Line 11: | ||
Memory: 4GB for each machine (<code>sudo dmidecode --type 17</code> to see RAM speed and type). | Memory: 4GB for each machine (<code>sudo dmidecode --type 17</code> to see RAM speed and type). | ||
For full system specifications, go [http://www.supermicro.com/products/launch/Intel/files/seaburg/6015TW-T_6015TW-INF.pdf here (PDF)] or on [http://www.tsunami.pt/produtodescricao.aspx?idtipo=6&idlinha=18&idgama=62&idproduto=389 | For full system specifications, go [http://www.supermicro.com/products/launch/Intel/files/seaburg/6015TW-T_6015TW-INF.pdf here (PDF)] or on [http://web.archive.org/web/20100609080705/http://www.tsunami.pt/produtodescricao.aspx?idtipo=6&idlinha=18&idgama=62&idproduto=389] on tsunami.pt (archived page). | ||
= Setup = | = Setup = | ||
Ubuntu LTS Server, 64-bit. Computer names: '''icubbrain1''' and '''icubbrain2'''. Administrator account: '''vislab''', demo account: '''icub'''. | |||
= Operating system installation = | = Operating system installation = | ||
Next, we will explain how to configure the left part of the server, called '''icubbrain1'''. The settings for icubbrain2 will be just about the same, with the last octet of the IP address being 42 instead of 41. In general, we follow the guidelines at [[ | Next, we will explain how to configure the left part of the server, called '''icubbrain1'''. The settings for icubbrain2 will be just about the same, with the last octet of the IP address being 42 instead of 41. In general, we follow the guidelines at [[iCub machines configuration]]. | ||
== Boot == | == Boot == | ||
| Line 60: | Line 44: | ||
broadcast 10.10.1.255 | broadcast 10.10.1.255 | ||
gateway 10.10.1.254 | gateway 10.10.1.254 | ||
[[Category:Vislab]] | [[Category:Vislab]] | ||
Latest revision as of 14:40, 23 October 2017

iCubBrain is a cluster of 2 machines used by VisLab to run the computation behind stable robot demos.
Old information can be consulted at iCubBrain/Archive.
Specifications
This twin server was purchased from Tetragon in June 2009. The box includes a SC808T-980 1U chassis (1U Twin size) with two twin X7DWT serverboards. Each of the two boards hosts an Intel Xeon 8-core processor (8 x E5405 @ 2.00 GHz). Each machine is an independent computer, having two hard disk drive drawers and its own power and reset buttons.
Memory: 4GB for each machine (sudo dmidecode --type 17 to see RAM speed and type).
For full system specifications, go here (PDF) or on [1] on tsunami.pt (archived page).
Setup
Ubuntu LTS Server, 64-bit. Computer names: icubbrain1 and icubbrain2. Administrator account: vislab, demo account: icub.
Operating system installation
Next, we will explain how to configure the left part of the server, called icubbrain1. The settings for icubbrain2 will be just about the same, with the last octet of the IP address being 42 instead of 41. In general, we follow the guidelines at iCub machines configuration.
Boot
Boot the Ubuntu Server CD from an external USB CD drive. Press the 'Del' key if you need to access the BIOS boot order.
Sometimes, you have to manually confirm the usage of a 'cdrom' module within the installation (following all the default selections).
Network interface
icubbrain1 has two Gbit interfaces. First we plug an Ethernet cable into the first one (which turns on the "1" led in the chassis front). Then, when Ubuntu asks to choose between eth0 and eth1, we pick up eth0.
Network configuration
- manually configure the internet connection (
/etc/network/interfaces):
  auto lo
  iface lo inet loopback

  auto eth0
  iface eth0 inet static
  address 10.10.1.41
  netmask 255.255.255.0
  network 10.10.1.0
  broadcast 10.10.1.255
  gateway 10.10.1.254