ICub instructions: Difference between revisions
m (→Other components: change order) |
(→Starting YARP components: embed new yarpmanager screenshots (2020)) |
||
| (77 intermediate revisions by the same user not shown) | |||
| Line 1: | Line 1: | ||
[[File:ICubLisbonSept2015bright.png|thumb|400px|right|caption|Lisbon iCub robot.]] | |||
''An older version of this article can be found at [[iCub | This article explains how to use the full-body Lisbon iCub robot (code-name: iCubLisboa01, nickname: Chico) for '''demos and experiments''' alike. We will describe the hardware setup that accompanies our iCub, how to turn things on and off, and how to run demos. For a generic description of the robot, refer to the [[Chico]] article. | ||
''An older version of this article can be found at [[iCub instructions/Archive]].'' | |||
== Setup == | == Setup == | ||
| Line 17: | Line 19: | ||
| 10.10.1.50, icub | | 10.10.1.50, icub | ||
|- | |- | ||
| '''[[iCub laptop]]''' | |||
| used to control the robot; also, it exports shared volumes (directories) to other machines of the computational cluster | |||
| '''[[ | |||
| | |||
| 10.10.1.53, icub | | 10.10.1.53, icub | ||
|} | |} | ||
Below Chico's | Below Chico's metal support, from top to bottom we have: | ||
{| class="wikitable" border="1" | {| class="wikitable" border="1" | ||
|- | |- | ||
| Line 36: | Line 34: | ||
|- | |- | ||
| Xantrex XFR 60-46 | | Xantrex XFR 60-46 | ||
| thick power supply unit, to power most motors. '''Voltage: | | thick power supply unit, to power most motors. '''Voltage: 40.0''' (initially it is 0 - it changes when you turn the green motor switch), current: 10.0 or more | ||
|- | |- | ||
| APC UPS | | APC UPS | ||
| Line 42: | Line 40: | ||
|} | |} | ||
In a separate room there are servers that make up the iCub computational cluster, to run the bulk of algorithms and programs (inverse kinematics, vision routines, etc.). | |||
== Switching on the robot == | == Switching on the robot == | ||
| Line 49: | Line 47: | ||
* Check that the UPS is on | * Check that the UPS is on | ||
* | * Check that the [[iCub laptop]] is on, if not switch it on | ||
* Turn on the Xantrex power supply units; make sure the voltage values are correct (see [[iCub_instructions#Setup]]) | |||
* Turn on the Xantrex power supply units; make sure the voltage values are correct (see [[ | |||
* Check that the '''red emergency button is unlocked''' | * Check that the '''red emergency button is unlocked''' | ||
* Turn on the green switches | * Turn on the green switches next to Chico | ||
** Safety hint: first turn on the [[pc104]] CPU switch, wait for the CPU to be on, and only then switch the motors on | ** Safety hint: first turn on the [[pc104]] CPU switch, wait for the CPU to be on, and only then switch the motors on | ||
** | ** Another safety hint, after turning on motors: wait for the four purple lights on each board to turn off and become two blue lights – at this point you can continue to the next steps | ||
=== Software side === | === Software side === | ||
* | * Check that the YARP Module Manager (yarpmanager) window is shown, if not run '''yarpmanager.sh''' from the laptop desktop icon and [[#Starting YARP components|start the needed YARP components (click here for detailed instructions)]]. The summary is: | ||
** First, | ** First, launch <code>yarpserver</code> with the 'Run' button in the Cluster tab | ||
** Then, if your application employs machines other than | ** Then, if your application employs machines other than the laptop itself, launch the necessary <code>yarprun</code> listeners in the Entities panel: '''icub-laptop, pc104, icubbrain1, icubbrain2, icub-cuda''' | ||
* | * The Entities tab is a GUI that manages all the necessary iCub applications | ||
** In the iCubStartup | ** In the iCubStartup application, launch all modules, including yarprobotinterface which is the most important one that will calibrate the robot. Just in case, make sure that the iCub is vertical before launching this software, otherwise the robot will fall down (dangerous) | ||
** Other | ** Other applications: depending on the desired application or demo, you will need to start other necessary drivers such as [[#Cameras | cameras]] or [[#Facial expression driver |facial expressions]] | ||
== Shutting off the robot == | == Shutting off the robot == | ||
| Line 71: | Line 67: | ||
=== Software side === | === Software side === | ||
* Stop your demo software and the cameras with the GUI; do not stop | * Stop your demo software and the cameras with the GUI; do not stop yarprobotinterface (in the iCubStartup panel) nor <code>yarpserver</code> (in the Cluster Manager window) | ||
* In the iCubStartup panel of the GUI, stop all modules, including | * In the iCubStartup panel of the GUI, stop all modules, including yarprobotinterface. Chico will thus move its limbs and head to a "parking" position. (If things don't quit gracefully, stop or kill the process more times and be ready to hold Chico's chest since the head may fall to the front.) | ||
* In the Cluster Manager window, stop the instances of <code>yarprun</code> | * In the Cluster Manager window, stop the instances of <code>yarprun</code> (lower panel). It is not necessary to stop <code>yarpserver</code> (upper panel), we usually keep it on | ||
=== Hardware side === | === Hardware side === | ||
* Turn off the two green switches. Pay attention when turning off the 'Motors' switch: if | * Shut down the [[pc104]] with this command in a terminal: <code>sudo halt</code> | ||
* Turn off the two green switches. Pay attention when turning off the 'Motors' switch: if yarprobotinterface was not stopped properly in the previous steps, then be ready to hold the robot when turning that switch | |||
* Turn off the Xantrex power supply units | * Turn off the Xantrex power supply units | ||
* | * Do not turn off the [[iCub laptop]], we usually keep it on | ||
== Stopping the robot with the red emergency button == | == Stopping the robot with the red emergency button == | ||
| Line 87: | Line 83: | ||
* When the robot is about to break something | * When the robot is about to break something | ||
* When some components make nasty noises that suggest they are going to break | * When some components make nasty noises that suggest they are going to break | ||
Use this button with great care, as it cuts power to all motors and controllers abruptly! In particular, be ready to hold Chico | Use this button with great care, as it cuts power to all motors and controllers abruptly! In particular, be ready to hold Chico, because the upper part of his body might fall upon losing power. | ||
To start using the robot again, it is convenient to quit and restart all the software components and interfaces; refer to [[#Switching on the robot]] for that. '''Don't forget to unlock the red emergency button''' after an emergency, otherwise the program [[# | To start using the robot again, it is convenient to quit and restart all the software components and interfaces; refer to [[#Switching on the robot]] for that. '''Don't forget to unlock the red emergency button''' after an emergency, otherwise the program [[#yarprobotinterface]] will start but not move any joint. | ||
== Starting YARP components == | == Starting YARP components == | ||
'' | * Click on the '''yarpmanager.sh''' icon on the desktop and select 'Run in Terminal' (or 'Run' if you want to suppress the optional debug information terminal) | ||
* You will see a window divided in two parts: Cluster Management and Nodes | |||
* In the Cluster part, click on the green 'Run yarpserver' play button. The light above the 'Stop' button will become green. | |||
* In the Nodes part, choose all the machines in the 'Select' column, then click 'Run Selected' and wait a bit so that all machines can turn on their green 'On' light. | |||
=== Screenshots === | |||
[[Image:Yarpmanager_launch_yarpserver.png|1024px]] | |||
[[Image: | |||
[[Image:Yarpmanager_launch_yarprun.png|1024px]] | |||
[[Image: | [[Image:Yarpmanager_launch_yarprobotinterface.png|1024px]] | ||
== Other components == | == Other components == | ||
Many demos and programs assume that components such as cameras, the | Many demos and programs assume that components such as cameras, the yarprobotinterface driver or the facial expression driver have been launched. To start them, first of all run the '''yarpmanager.sh''' icon. A GUI similar to this one will appear: | ||
[[Image:gyarpmanager.png]] | |||
When you have one or more applications running, each one will have its panel (tab) and the following toolbar will be visible. Here are the most important functions (which affect all modules of the currently selected application): | |||
[[Image:gyarpmanager_toolbar.png]] | |||
=== yarprobotinterface === | |||
This program controls the motors and reads the robot sensors (encoders, inertial sensor, skin, force/torque). It is needed by almost all demos. | |||
''' | * '''check that the red emergency button is unlocked''' | ||
* open the '''iCubStartup''' panel in the yarpmanager GUI; click the Run Application button. This will start both kinematics (yarprobotinterface, cartesian solvers and gaze control) and dynamics (wholeBodyDynamics and gravityCompensator) | |||
Wait for all boards to answer (which takes around 1 minute); after that, you are ready to move on. | Wait for all boards to answer (which takes around 1 minute); after that, you are ready to move on. | ||
There is a GUI application to | There is a GUI application to manually command robot joints. Just invoke it from the [[iCub laptop]] with: | ||
yarpmotorgui | |||
=== Cameras === | === Cameras === | ||
* Make sure that basic YARP components are running: [[#Switching on the robot|summarized Cluster Manager instructions are here]]; detailed instructions are in section [[#Starting YARP components]] | * Make sure that basic YARP components are running: [[#Switching on the robot|summarized Cluster Manager instructions are here]]; detailed instructions are in section [[#Starting YARP components]] | ||
* | * open the '''Cameras_320x240_for_ball_tracking''' panel in the yarpmanager GUI; click the Run Application button; click the Connect Links button | ||
=== Facial expression driver === | === Facial expression driver === | ||
* Make sure that basic YARP components are running: [[#Switching on the robot|summarized Cluster Manager instructions are here]]; detailed instructions are in section [[#Starting YARP components]] | * Make sure that basic YARP components are running: [[#Switching on the robot|summarized Cluster Manager instructions are here]]; detailed instructions are in section [[#Starting YARP components]] | ||
* | * open the '''Face_Expressions''' panel in the yarpmanager GUI; click the Run Application button; click the Connect Links button | ||
Note that the actual expression device driver (the first module of the two listed) runs on the [[pc104]]. Sometimes, that process cannot be properly killed and restarted from the graphical interface; in the event of you needing to do that, you can either <code>kill -9</code> its PID, or do a hard restart of the [[pc104]]. | |||
=== iCubGui === | |||
This component shows a real-time 3D model of the robot on the screen. | |||
* Make sure that basic YARP components are running: [[#Switching on the robot|summarized Cluster Manager instructions are here]]; detailed instructions are in section [[#Starting YARP components]] | |||
* open the '''iCubGui''' panel in the yarpmanager GUI; click the Run Application button; click the Connect Links button | |||
=== Skin GUI === | === Skin GUI === | ||
* Make sure that basic YARP components are running: [[#Switching on the robot|summarized Cluster Manager instructions are here]]; detailed instructions are in section [[#Starting YARP components]] | * Make sure that basic YARP components are running: [[#Switching on the robot|summarized Cluster Manager instructions are here]]; detailed instructions are in section [[#Starting YARP components]] | ||
* | * open the '''Skin_Gui_All''' panel in the yarpmanager GUI; click the Run Application button; click the Connect Links button | ||
== Specific demos == | == Specific demos == | ||
| Line 148: | Line 152: | ||
''Refer to [[iCub demos/Archive]] for older information such as starting demos from terminals''. | ''Refer to [[iCub demos/Archive]] for older information such as starting demos from terminals''. | ||
=== Ball tracking and grasping | === Ball tracking and grasping === | ||
* Make sure that basic YARP components are running: [[#Switching on the robot|summarized Cluster Manager instructions are here]]; detailed instructions are in section [[#Starting YARP components]] | * Make sure that basic YARP components are running: [[#Switching on the robot|summarized Cluster Manager instructions are here]]; detailed instructions are in section [[#Starting YARP components]] | ||
* | * Make sure that the applications iCubStartup, Cameras_320x240_for_Ball_Tracking have been started | ||
* Optionally, Face_Expression and iCubGui can be started too | |||
* open the '''Red-Ball_Demo''' panel in the yarpmanager GUI; click the Run Application button; click the Connect Links button | |||
Note that this demo launches the left eye camera with special parameter values: | Note that this demo launches the left eye camera with special parameter values: | ||
| Line 164: | Line 170: | ||
gain 0.305 | gain 0.305 | ||
=== | === Facial expressions === | ||
* Make sure that basic YARP components are running: [[#Switching on the robot|summarized Cluster Manager instructions are here]]; detailed instructions are in section [[#Starting YARP components]] | |||
* Start the [[#Facial expression driver | facial expression driver]] | |||
* Select the '''EMOTIONS2''' icon (Run in terminal); stop with ctrl+c | |||
=== Force Control === | |||
* Make sure that basic YARP components are running: [[#Switching on the robot|summarized Cluster Manager instructions are here]]; detailed instructions are in section [[#Starting YARP components]] | * Make sure that basic YARP components are running: [[#Switching on the robot|summarized Cluster Manager instructions are here]]; detailed instructions are in section [[#Starting YARP components]] | ||
* Make sure that | * Make sure that the applications iCubStartup has been started | ||
* | * Click on the '''Force_Control''' panel in the yarpmanager GUI, Run Application, Connect Links | ||
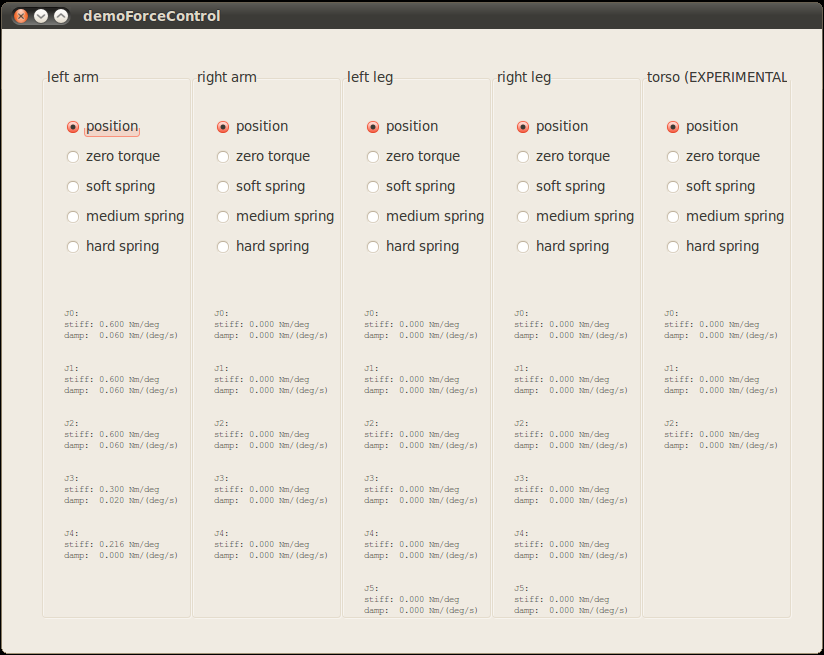
* | * select the desired modality (screenshot below) and manually move the robot limbs: | ||
* | [[Image:Force_control_gui.png]] | ||
* More information available here: http://eris.liralab.it/wiki/Force_Control | |||
=== Interactive Objects Learning Behavior === | |||
For this demo, you also need a Windows machine with a <code>yarprun</code> listener (the speech recognition module will be launched on this machine). | |||
In yarpmanager, select the "Interactive Objects Learning Behavior with SCSPM" application: refresh, run, connect. | |||
The grammar of recognized spoken sentences is located at | |||
https://github.com/robotology/iol/blob/master/app/lua/verbalInteraction.txt | |||
Notes: do the following commands for using IOL Object Recognition side by side with the POETICON++ demo. | |||
yarp rpc /actionsRenderingEngine/cmd:io | |||
home all | |||
yarp rpc /iolStateMachineHandler/human:rpc | |||
attention stop | |||
=== | === Yoga === | ||
* Make sure that basic YARP components are running: [[#Switching on the robot|summarized Cluster Manager instructions are here]]; detailed instructions are in section [[#Starting YARP components]] | * Make sure that basic YARP components are running: [[#Switching on the robot|summarized Cluster Manager instructions are here]]; detailed instructions are in section [[#Starting YARP components]]. For this demo we only need <code>yarpserver</code> (<code>yarprun</code>s are not necessary) | ||
* Make sure that [[# | * Make sure that iCubStartup ([[#yarprobotinterface|yarprobotinterface]]) is running | ||
* open the '''Yoga''' panel in the yarpmanager GUI; click the Run Application button | |||
* | |||
[[Category:Vislab]] | [[Category:Vislab]] | ||
Latest revision as of 18:58, 14 February 2020
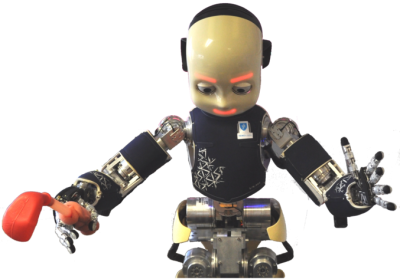
This article explains how to use the full-body Lisbon iCub robot (code-name: iCubLisboa01, nickname: Chico) for demos and experiments alike. We will describe the hardware setup that accompanies our iCub, how to turn things on and off, and how to run demos. For a generic description of the robot, refer to the Chico article.
An older version of this article can be found at iCub instructions/Archive.
Setup
The inventory consists of:
| machine | notes | IP address, username |
|---|---|---|
| Chico the robot (duh) | has a pc104 CPU in its head | 10.10.1.50, icub |
| iCub laptop | used to control the robot; also, it exports shared volumes (directories) to other machines of the computational cluster | 10.10.1.53, icub |
Below Chico's metal support, from top to bottom we have:
| what | notes |
|---|---|
| Xantrex XFR 35-35 | thin power supply unit, to power pc104 and some motors. Voltage: 12.9, current: 05.0 or more |
| Xantrex XFR 60-46 | thick power supply unit, to power most motors. Voltage: 40.0 (initially it is 0 - it changes when you turn the green motor switch), current: 10.0 or more |
| APC UPS | uninterruptible power supply |
In a separate room there are servers that make up the iCub computational cluster, to run the bulk of algorithms and programs (inverse kinematics, vision routines, etc.).
Switching on the robot
Hardware side
- Check that the UPS is on
- Check that the iCub laptop is on, if not switch it on
- Turn on the Xantrex power supply units; make sure the voltage values are correct (see iCub_instructions#Setup)
- Check that the red emergency button is unlocked
- Turn on the green switches next to Chico
- Safety hint: first turn on the pc104 CPU switch, wait for the CPU to be on, and only then switch the motors on
- Another safety hint, after turning on motors: wait for the four purple lights on each board to turn off and become two blue lights – at this point you can continue to the next steps
Software side
- Check that the YARP Module Manager (yarpmanager) window is shown, if not run yarpmanager.sh from the laptop desktop icon and start the needed YARP components (click here for detailed instructions). The summary is:
- First, launch
yarpserverwith the 'Run' button in the Cluster tab - Then, if your application employs machines other than the laptop itself, launch the necessary
yarprunlisteners in the Entities panel: icub-laptop, pc104, icubbrain1, icubbrain2, icub-cuda
- First, launch
- The Entities tab is a GUI that manages all the necessary iCub applications
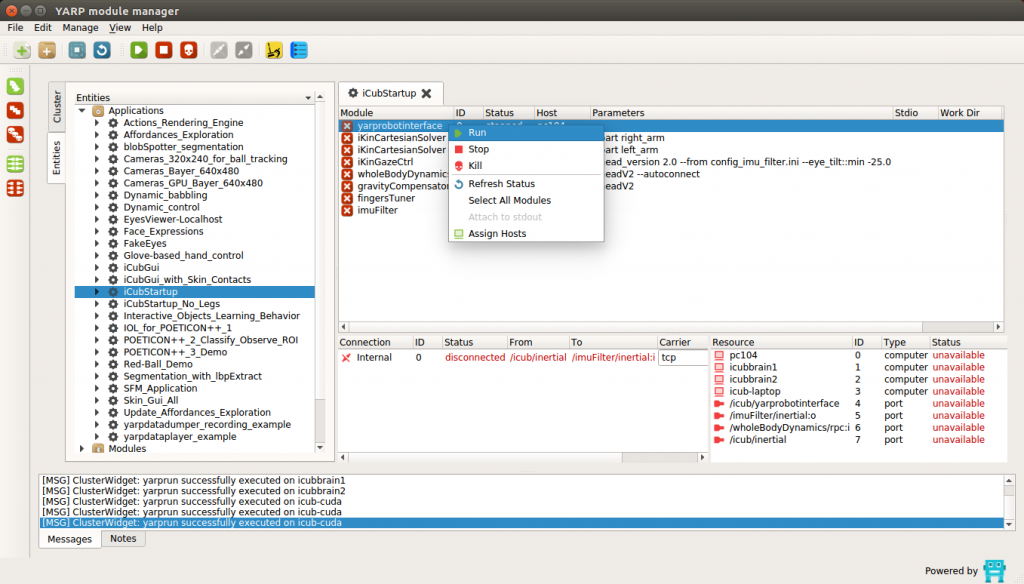
- In the iCubStartup application, launch all modules, including yarprobotinterface which is the most important one that will calibrate the robot. Just in case, make sure that the iCub is vertical before launching this software, otherwise the robot will fall down (dangerous)
- Other applications: depending on the desired application or demo, you will need to start other necessary drivers such as cameras or facial expressions
Shutting off the robot
Software side
- Stop your demo software and the cameras with the GUI; do not stop yarprobotinterface (in the iCubStartup panel) nor
yarpserver(in the Cluster Manager window) - In the iCubStartup panel of the GUI, stop all modules, including yarprobotinterface. Chico will thus move its limbs and head to a "parking" position. (If things don't quit gracefully, stop or kill the process more times and be ready to hold Chico's chest since the head may fall to the front.)
- In the Cluster Manager window, stop the instances of
yarprun(lower panel). It is not necessary to stopyarpserver(upper panel), we usually keep it on
Hardware side
- Shut down the pc104 with this command in a terminal:
sudo halt - Turn off the two green switches. Pay attention when turning off the 'Motors' switch: if yarprobotinterface was not stopped properly in the previous steps, then be ready to hold the robot when turning that switch
- Turn off the Xantrex power supply units
- Do not turn off the iCub laptop, we usually keep it on
Stopping the robot with the red emergency button
The emergency button, as the name suggests, is to be used for emergencies only. For example:
- When the robot is about to break something
- When some components make nasty noises that suggest they are going to break
Use this button with great care, as it cuts power to all motors and controllers abruptly! In particular, be ready to hold Chico, because the upper part of his body might fall upon losing power.
To start using the robot again, it is convenient to quit and restart all the software components and interfaces; refer to #Switching on the robot for that. Don't forget to unlock the red emergency button after an emergency, otherwise the program #yarprobotinterface will start but not move any joint.
Starting YARP components
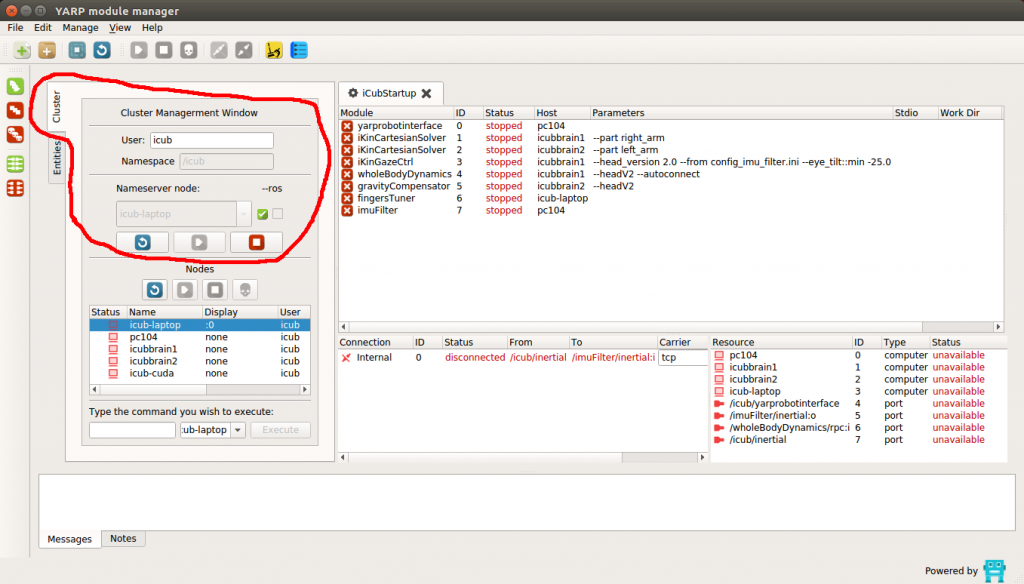
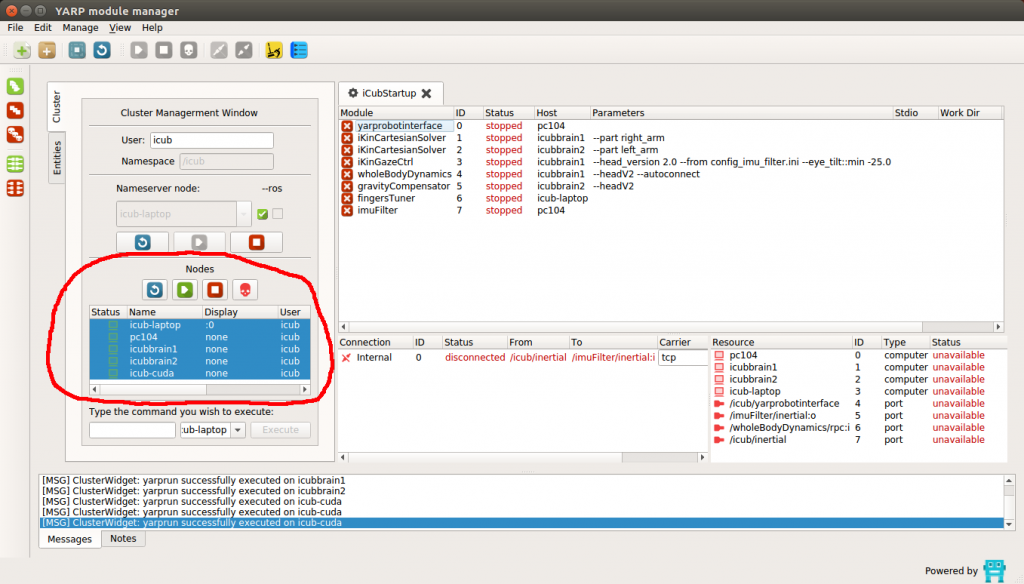
- Click on the yarpmanager.sh icon on the desktop and select 'Run in Terminal' (or 'Run' if you want to suppress the optional debug information terminal)
- You will see a window divided in two parts: Cluster Management and Nodes
- In the Cluster part, click on the green 'Run yarpserver' play button. The light above the 'Stop' button will become green.
- In the Nodes part, choose all the machines in the 'Select' column, then click 'Run Selected' and wait a bit so that all machines can turn on their green 'On' light.
Screenshots
Other components
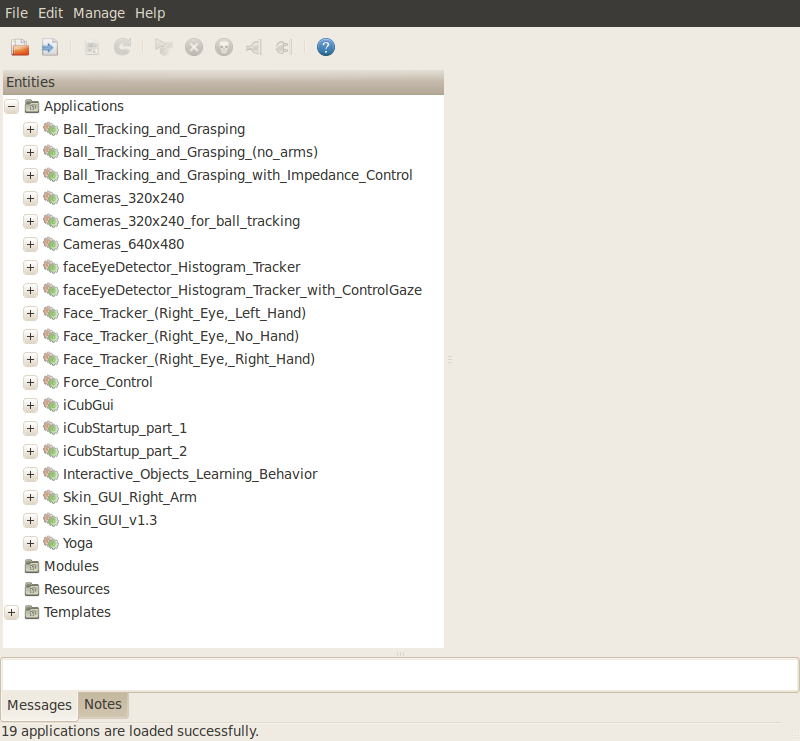
Many demos and programs assume that components such as cameras, the yarprobotinterface driver or the facial expression driver have been launched. To start them, first of all run the yarpmanager.sh icon. A GUI similar to this one will appear:
When you have one or more applications running, each one will have its panel (tab) and the following toolbar will be visible. Here are the most important functions (which affect all modules of the currently selected application):
yarprobotinterface
This program controls the motors and reads the robot sensors (encoders, inertial sensor, skin, force/torque). It is needed by almost all demos.
- check that the red emergency button is unlocked
- open the iCubStartup panel in the yarpmanager GUI; click the Run Application button. This will start both kinematics (yarprobotinterface, cartesian solvers and gaze control) and dynamics (wholeBodyDynamics and gravityCompensator)
Wait for all boards to answer (which takes around 1 minute); after that, you are ready to move on.
There is a GUI application to manually command robot joints. Just invoke it from the iCub laptop with:
yarpmotorgui
Cameras
- Make sure that basic YARP components are running: summarized Cluster Manager instructions are here; detailed instructions are in section #Starting YARP components
- open the Cameras_320x240_for_ball_tracking panel in the yarpmanager GUI; click the Run Application button; click the Connect Links button
Facial expression driver
- Make sure that basic YARP components are running: summarized Cluster Manager instructions are here; detailed instructions are in section #Starting YARP components
- open the Face_Expressions panel in the yarpmanager GUI; click the Run Application button; click the Connect Links button
Note that the actual expression device driver (the first module of the two listed) runs on the pc104. Sometimes, that process cannot be properly killed and restarted from the graphical interface; in the event of you needing to do that, you can either kill -9 its PID, or do a hard restart of the pc104.
iCubGui
This component shows a real-time 3D model of the robot on the screen.
- Make sure that basic YARP components are running: summarized Cluster Manager instructions are here; detailed instructions are in section #Starting YARP components
- open the iCubGui panel in the yarpmanager GUI; click the Run Application button; click the Connect Links button
Skin GUI
- Make sure that basic YARP components are running: summarized Cluster Manager instructions are here; detailed instructions are in section #Starting YARP components
- open the Skin_Gui_All panel in the yarpmanager GUI; click the Run Application button; click the Connect Links button
Specific demos
Refer to iCub demos/Archive for older information such as starting demos from terminals.
Ball tracking and grasping
- Make sure that basic YARP components are running: summarized Cluster Manager instructions are here; detailed instructions are in section #Starting YARP components
- Make sure that the applications iCubStartup, Cameras_320x240_for_Ball_Tracking have been started
- Optionally, Face_Expression and iCubGui can be started too
- open the Red-Ball_Demo panel in the yarpmanager GUI; click the Run Application button; click the Connect Links button
Note that this demo launches the left eye camera with special parameter values:
 brightness 0
 sharpness 0.5
 white balance red 0.474      // you may need to lower this, depending on illumination
 white balance blue 0.648
 hue 0.482
 saturation 0.826
 gamma 0.400
 shutter 0.592
 gain 0.305
Facial expressions
- Make sure that basic YARP components are running: summarized Cluster Manager instructions are here; detailed instructions are in section #Starting YARP components
- Start the facial expression driver
- Select the EMOTIONS2 icon (Run in terminal); stop with ctrl+c
Force Control
- Make sure that basic YARP components are running: summarized Cluster Manager instructions are here; detailed instructions are in section #Starting YARP components
- Make sure that the applications iCubStartup has been started
- Click on the Force_Control panel in the yarpmanager GUI, Run Application, Connect Links
- select the desired modality (screenshot below) and manually move the robot limbs:
- More information available here: http://eris.liralab.it/wiki/Force_Control
Interactive Objects Learning Behavior
For this demo, you also need a Windows machine with a yarprun listener (the speech recognition module will be launched on this machine).
In yarpmanager, select the "Interactive Objects Learning Behavior with SCSPM" application: refresh, run, connect.
The grammar of recognized spoken sentences is located at https://github.com/robotology/iol/blob/master/app/lua/verbalInteraction.txt
Notes: do the following commands for using IOL Object Recognition side by side with the POETICON++ demo.
 yarp rpc /actionsRenderingEngine/cmd:io
 home all
 yarp rpc /iolStateMachineHandler/human:rpc
 attention stop
Yoga
- Make sure that basic YARP components are running: summarized Cluster Manager instructions are here; detailed instructions are in section #Starting YARP components. For this demo we only need
yarpserver(yarpruns are not necessary) - Make sure that iCubStartup (yarprobotinterface) is running
- open the Yoga panel in the yarpmanager GUI; click the Run Application button
