Chico: Difference between revisions
m (→Arm fine calibration: Update name of module) |
(→iCub health checkup week: move to Archive subpage) |
||
| (3 intermediate revisions by the same user not shown) | |||
| Line 19: | Line 19: | ||
Basically, with yarpmotorgui set the arm joints to [-90 15 15 90]. Visually compare the arm angles with the reference picture. | Basically, with yarpmotorgui set the arm joints to [-90 15 15 90]. Visually compare the arm angles with the reference picture. | ||
== Hardware == | == Hardware == | ||
| Line 33: | Line 25: | ||
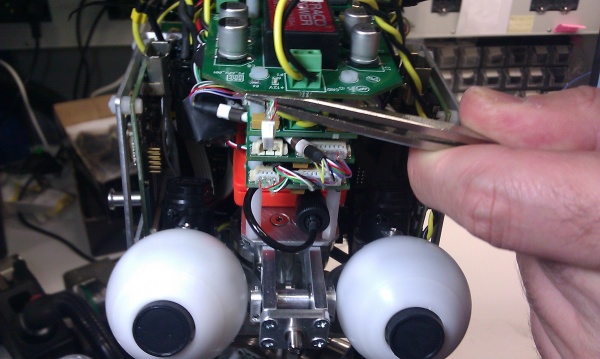
[[Image:ICub_headV2_CAN0_board14_disconnected.jpg|600px|How to disconnect board 14.]] | [[Image:ICub_headV2_CAN0_board14_disconnected.jpg|600px|How to disconnect board 14.]] | ||
When a joint/encoder breaks, refer to [[Chico joint calibration]]. | When a joint/encoder breaks, refer to [[Chico joint calibration]]. | ||
| Line 51: | Line 30: | ||
== Firmware == | == Firmware == | ||
Keep same Release and Version numbers; only increment Build number. Refer to [http:// | Keep same Release and Version numbers; only increment Build number. Refer to [http://wiki.icub.org/wiki/Firmware this page] from the official iCub manual, using the following script: | ||
./updateRobot.sh updateLisboa01.txt | ./updateRobot.sh updateLisboa01.txt | ||
[[Category:Robots]] | [[Category:Robots]] | ||
[[Category:Vislab]] | [[Category:Vislab]] | ||
Latest revision as of 16:02, 10 July 2017
This article describes Chico (code-name iCubLisboa01, iCub version 1.2.1), the whole-body humanoid robot of Vislab.
For demo instructions, refer to iCub instructions.
Note: see Chico/Archive about historical information.
TODO: to be completed and updated, in particular the firmware information below is obsolete.
Preliminaries
- the iCub has a PC104 with a flash disk configured with IP 10.10.1.50
- it mounts the repositories that are on the icub-laptop machine (10.10.1.53)
Maintenance
Arm fine calibration
Refer to http://wiki.icub.org/wiki/ArmFineCalibration
Basically, with yarpmotorgui set the arm joints to [-90 15 15 90]. Visually compare the arm angles with the reference picture.
Hardware
CAN 0, board 14 is just a spare board that lies in Chico's head (inherited from the design of the previous version of the head), not being used at the moment. It can slow down the CAN communication because the board is present and responding. If needed, we can disconnect it as shown:
When a joint/encoder breaks, refer to Chico joint calibration.
Firmware
Keep same Release and Version numbers; only increment Build number. Refer to this page from the official iCub manual, using the following script:
./updateRobot.sh updateLisboa01.txt
