Affordance imitation
Modules
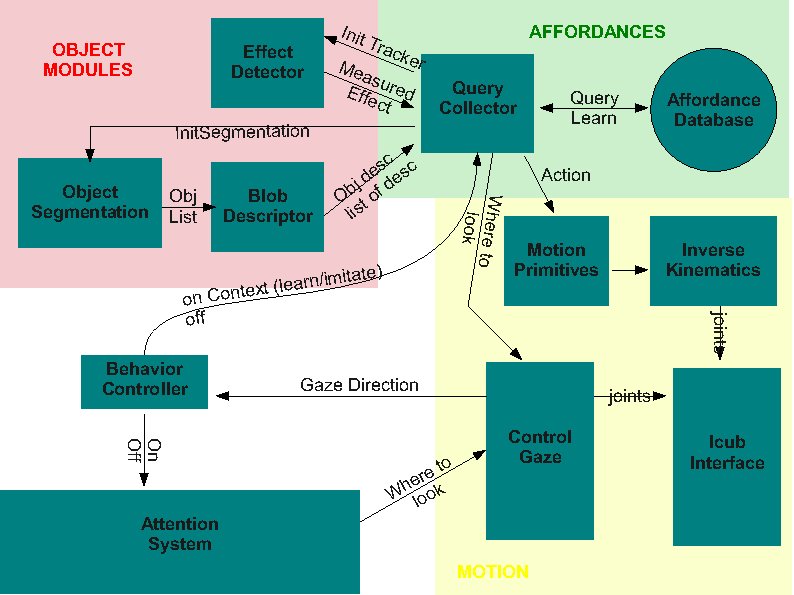
This is the architecture for the Object Affordances demo, shown during the RobotCub review of January 2010.
 (scheme updated on 2009-07-28)
Manual
Last Update: March 12 2013
Instructions to install and run this demo, for the POETICON++ project. This has been tested with Ubuntu 12.04, 32-bit and 64-bit, using the iCub pre-compiled binaries.
Requirements:
From binaries
Set your source list as explained on iCub.org:
sudo sh -c 'echo "deb http://www.icub.org/ubuntu precise contrib/science" > /etc/apt/sources.list.d/icub.list'
Install the icub and icub-common packages:
 sudo apt-get update
 sudo apt-get install icub icub-common
Do not forget to add the build directory of the demoAffv3 to your PATH variable.
export PATH=$PATH:~/workspace/vislab/prj/poeticon++/demoaffv3/build
From source
Custom iCub configuration: first compile IPOPT according to the official RobotCub wiki guide (http://wiki.icub.org/wiki/Installing_IPOPT), then proceed to configuring the actual iCub repository:
 ENABLE_icubmod_cartesiancontrollerserver
 ENABLE_icubmod_cartesiancontrollerclient
 ENABLE_icubmod_gazecontrollerclient
Do not forget to add the build directory of the demoAffv3 to your PATH variable.
export PATH=$PATH:~/workspace/vislab/prj/poeticon++/demoaffv3/build
Build:
Checkout the project from the Vislab's repository:
svn co svn://svn.isr.ist.utl.pt/vislab
Compile the project:
 cd vislab/prj/poeticon++/demoaffv3
 mkdir build; cd build
 cmake ..
 make
Verify that the build reached 100% and that you have all of the following binaries:
 affordanceController
 behaviorController
 attentionSelection
 effectDetector
 blobDescriptor
 edisonSegmenter
 controlGaze
Execution:
Edit the iCub_parts_activation.ini file, located either in /usr/share/iCub/app/simConfig/conf/ or $ICUB_ROOT/app/simConfig/conf/. Switch 'objects' value from 'off' to 'on' under the RENDER group to have the test table rendered on the scene.
All of the following commands are to be ran on a separate terminal each and from inside the build folder.
First launch some mandatory applications:
 1. yarpserver
 2. yarprun --server /localhost
 3. iCub_SIM
Then launch a manager for running the dependencies of the demo:
4. manager.py ../scripts/demoaffv3_dependencies.xml
Launch yet another manager to run the remaining modules of the demo:
5. manager.py ../scripts/demoaffv3_application.xml
If the robot is not gazing at the ball on the table, you can issue a command to /controlGaze/conf to do so:
 6. yarp rpc /controlGaze/conf
 7. sac abs -20 -50
There is a specific port, /demoAffv2/behavior/in, from the behaviorControlModule, which is expecting an input command (att or aff) to initiate the demo.
Open a yarp write and launch the aff command:
 8. yarp write ... /demoAffv2/behavior/in
 9. aff
Robot/Simulator switching
The current demo is set to work on the iCub's simulator. Should you want to switch to the real robot, please make the following changes:
- Edit the iCub_parts_activation.ini file, located either in /usr/share/iCub/app/simConfig/conf/ or $ICUB_ROOT/app/simConfig/conf/. Switch 'objects' value from 'on' to 'off' under the RENDER group to not have the test table rendered on the scene.
- Change the robot's name on the affActionPrimitives.ini file, located under the conf/ folder of the project, from 'icubSim' to 'icub'.
- Change the robot's name on the left_armGraspDetectorConf.ini file, located under the conf/ folder of the project, from 'icubSim' to 'icub'.
- Change the robot's name on the right_armGraspDetectorConf.ini file, located under the conf/ folder of the project, from 'icubSim' to 'icub'.
- Change the robot's name on the controlGaze.ini file, located under the conf/ folder of the project, from 'icubSim' to 'icub'.
- Change the input port name on the left_armGraspDetectorConf.ini file, located under the conf/ folder of the project, from '/icub/left_hand/analog:o' to '/icubSim/left_hand/analog:o'.
- Change the input port name on the right_armGraspDetectorConf.ini file, located under the conf/ folder of the project, from '/icub/right_hand/analog:o' to '/icubSim/right_hand/analog:o'.
Optional:
You should consider these options in case some compilation problems occur.
- Install OpenCV from its source instead of relying on the version installed by the icub-common package.
- Should the compilation fail because of any problem related to the PNL library, you can download it from here and recompile it.
 ./configure.gcc
 make
- Afterwards, copy all the .a library files into the project's PNL library folder:
find . -type f -name '*.a' -exec cp {} $DEMOAFFV3_DIR/src/affordanceControlModule/lib/pnl \;
- This will copy all the .a files into the right folder, given that you have configured the $DEMOAFFV3_DIR variable.
- The last step is to rename the copied files, overwriting the existing ones. If you compiled PNL on a 32-bit architecture, please rename the files by adding the '_x86' prefix. If you compiled PNL on a 32-bit architecture, then please rename the files by adding the '_x64' prefix.
Demo Organization
We divide the software that makes up this demo into two chunks, or applications:
- Attention System
- Object Affordances application, which contains everything else
Each of the above applications is internally composed of several modules.
Attention System application
Installation
- Adjust and install the
camera_calib.xml.templatefrom$ICUB_ROOT/app/default/scriptsfor your robot. Adjust everything tagged as 'CHANGE' (nodes, contexts, config files). UsecamCalibConfigto determine the calibration parameters.camera_calib.xmlstarts the cameras, framegrabber GUIs, image viewers and camera calibration modules. - Adjust and install the
attention.xml.templatefrom$ICUB_ROOT/app/demoAffv2/scripts. Adjust everything tagged as 'CHANGE' (mainly nodes). Make sure you compiled the Qt user interface at least on your local machine used for graphical interaction. This application depends on thecamera_calib.xml(cameras and camera calibration ports) and on the icub/head motor controlboard (dependencies are listed by themanager.py).
Running
- Start the
cameras_calib.xml application using the manager.py script. Check that you obtain the calibrated images.
- Start the
attention.xml application using the manager.py script. Check that all modules and ports are up and ready. You should see now the Qt user interface (applicationGui) on the machine you configured it to run on. You can then either connect all the listed connections shown in the manager.py user interface or use the applicationGui to connect them one by one. Note: You need to initialize the salience filter user interface by pressing the button 'initialize', this loads user interface controls for the available filters the salience module is running. Set at least one filter weight to non-zero, to start the attention system.
Switch On/Off the Attention System
- The attentionSelection module implements a switch for modules which want to attach/detach the attention system to/from the robot head controller. To do so you can either include the attentionSalienceLib in your project and use the RemoteAttentionSelection class which connects to the attentionSelection/conf port or, if you prefer to do it 'by hand', you can send a bottle of the format (('set')('out')(1/0)) to the attentionSelection/conf port. Setting out to 1 or calling RemoteAttentionSelection::setInhibitOutput(1) will inhibit head control commands being sent from attentionSelection to controlGaze.
Object Affordances application
The core of this application is coordinated by the Query Collector (demoAffv2 in iCub repository); so, the application folder is in $ICUB_ROOT/app/demoAffv2: XML scripts and .ini config files of all Affordances-related modules belong there, in subdirectories scripts/ and conf/ respectively.
Currently existing .ini configuration files:
- edisonConfig.ini - configuration file for the Edison Blob Segmentation module
- blobDescriptor.ini
Currently existing XML files (these are generic templates - our versions are in $ICUB_ROOT/app/iCubLisboa01/scripts/demoAffv2):
- blob_descriptor.xml.template
- edison_segmentation.xml.template
- effect_detector_debug.xml.template
Camera parameters
We use these FrameGrabberGUI parameters for the left camera:
- Features:
- Shutter: 0.65
- RED: 0.478
- BLUE: 0.648
- Features (adv)
- Saturation: 0.6
affActionPrimitives
In November 2009, Christian, Ugo and others began the development of a module containing affordances primitives, called affActionPrimitives in the iCub repository. This module relies on the ICartesianControl interface, hence to compile it you need to enable the module icubmod_cartesiancontrollerclient in CMake while compiling the iCub repository, and to make this switch visible you have to tick the USE_ICUB_MOD just before.
Attention: perform CMake configure/generate operations twice in a row prior to compiling the new module, due to a CMake bug; moreover, do not remove the CMake cache between the first and the second configuration.
To enable the cartesian features on the PC104, you have to launch iCubInterface pointing to the iCubInterfaceCartesian.ini file. Just afterwards you need to launch the solvers through the Application Manager XML file located under $ICUB_ROOT/app/cartesianSolver/scripts. PC104 code requires to be compiled with option icubmod_cartesiancontrollerserver active; but the iCubLisboa01 is already prepared.
EdisonSegmentation (blob segmentation)
Implemented by edisonSegmentation module in the iCub repository.
Module that takes a raw RGB image as input and provides a segmented (labeled) image at the output, indicating possible objects or object parts present in the scene.
Ports:
- /conf
- configuration
- /rawImg:i
- input original image (RGB)
- /rawImg:o
- output original image (RGB)
- /labeledImg:o (INT)
- segmented image with the labels
- /viewImg:o
- Segmented image with the colors models for each region (good to visualize)
Check full documentation at the official iCub Software Site
Example of application:
edisonSegmentation.exe --context demoAffv2/conf
yarpdev --device opencv_grabber --movie segm_test_icub.avi --loop --framerate 0.1
yarpview /raw
yarpview /view
yarp connect /grabber /edisonSegm/rawImg:i
yarp connect /edisonSegm/rawImg:o /raw
yarp connect /edisonSegm/viewImg:o /view
Video file segm_test_icub.avi is a sequence with images taken from the icub with colored objects in front and can be downloaded here.
BlobDescriptor
Implemented by blobDescriptor in the iCub repository.
Module that receives a labeled image and the corresponding raw image and creates descriptors for each one of the identified objects.
Ports (not counting the prefix /blobDescriptor):
/rawImg:i/labeledImg:i/rawImg:o/viewImg:o - image with overlay edges/affDescriptor:o/trackerInit:o - colour histogram and parameters that will serve to initialize a tracker, e.g., CAMSHIFT
Full documentation from the official iCub repository is here.
EffectDetector
Implemented by effectDetector module in the iCub repository.

Algorithm:
  1.wait for initialization signal and parameters on /init
  2.read the raw image that was used for the segmentation on /rawsegmimg:i
  3.read the current image on /rawcurrimg:i
  4.check if the the ROI specified as an initialization parameter is similar in the two images
  5.if (similarity<threshold)
  6.  answer 0 on /init and go back to 1.
  7.else
  8.  answer 1 on /init
  9.  while(not received another signal on /init)
 10.    estimate the position of the tracked object
 11.    write the estimate on /effect:o
 12.    read a new image on /rawcurrimg:i
 13.  end
 14.end
Ports:
- /init //receives a bottle with (u, v, width, height, h1, h2, ..., h16, vmin, vmax, smin), answers 1 for success or 0 for failure.
- /rawSegmImg:i //raw image that was used for the segmentation
- /rawCurrImg:i
- /effect //flow of (u,v) positions of the tracked object
Example of application:
yarpserver
effectDetector
yarpdev --device opencv_grabber --name /images
  yarp connect /images /effectDetector/rawcurrimg
  yarp connect /images /effectDetector/rawsegmimg
  yarp write ... /effectDetector/init
  #type this as input:
  350 340 80 80 255 128 0 0 0 0 0 0 0 0 0 0 0 0 0 255 0 256 150
  yarp read ... /effectDetector/effect
  #show something red to the camera, to see something happening.
QueryCollector
Implemented by demoAffv2 module in the iCub repository.
Module that receives inputs from the object descriptor module and the effect descriptor. When activated by the behavior controller, info about the objects is used to select actions that will be executed by the robot. In the absence of interaction activity, it notifies it to the behavior controller that may decide to switch to another behavior.
Ports:
- /demoAffv2/effect
- /demoAffv2/synccamshift
- /demoAffv2/objsdesc
- /demoAffv2/
- /demoAffv2/motioncmd
- /demoAffv2/gazecmd
- /demoAffv2/behavior:i
- /demoAffv2/behavior:o
- /demoAffv2/out
- /demoAffv2/out
Ports and communication
The interface between modules is under development. The current version (subject to changes as we refine it) is as follows:
- Behavior to AttentionSelection -> vocabs "on" / "off"
- Behavior to Query -> vocabs "on" / "off". We should add some kind of context to the on command (imitation or learning being the very basic).
- Gaze Control -> Behavior: read the current head state/position
- Query to Behavior -> "end" / "q"
- Query to Effect Detector. The main objective of this port is to start the tracker at the object of interest. We need to send at least:
- position (x,y) within the image. 2 doubles.
- size (h,w). 2 doubles.
- color histogram. TBD.
- saturation parameters (max min). 2 int.
- intensity (max min). 2 int.
- Effect Detector to Query
- Camshiftplus format
- blobDescriptor -> query
- Affordance descriptor. Same format as camshiftplus
- tracker init data. histogram (could be different from affordance) + saturation + intensity
- query -> object segmentation
- vocab message: "do seg"
- object segmentation -> blob descriptor
- labelled image
- raw image
December Tests
Some tests on the grasping actions were done during Ugo Pattacini' visit to ISR/IST on 14–18 December 2009.
These were aimed at tuning the action generator module to manipulate objects on a table, particularly grasping. Results of such demos can be seen in the following video:
icub_grasps_sponges.wmv
The application was assembled by running the modules:
- eye2world (2 instances)
- iKinGazeCtrl
- yarpview /gaze --click
- yarpview /grasp --click
- testMod (affActionPrimitives)
The eye2world module was configured with a table height of -6cm, a height offset of 6cm and the object height was 9.5 cm.
The left camera was streaming images to both yarpview modules.
On the gaze yarpview, Christian was clicking on appropriate points to look at.
On the grasp yarpview Christian was clicking on the middle of the top surface of the sponge.
Both yarpviews were connected to instances of the eye2world module that converted them to 3D points reconstructed above the table position. The 3D coordinates associated to gaze points were sent to iKinGazeCtrl and the 3D coordinates associated to grasp points were sent to the grasp module.
TODO: replace Christian by software modules :-)
December Tests II
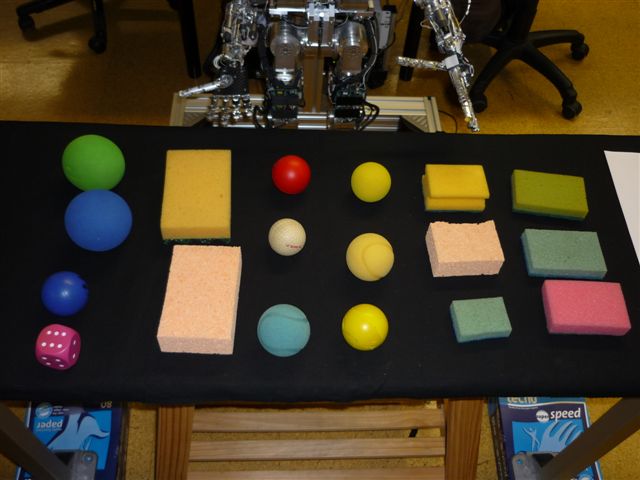
On 28 December 2009, Alex and Giovanni performed some tests on the co-operation of the several vision modules for affordances (edisonSegmentation, blobDescriptor, effectDetector). The aim was to test which objects were more reliable to segment and track and tune some module parameters. The setup was a black table where the iCub was gazing and where several objects were displaced.
The first test considered a single object at a time. The object was segmented by the edisonSegmentation module and manually selected. In the full demo, it will be the affordances network that will select the module. Then, the tracker was initialized automatically from the blob's color statistics. A critical parameter v_min is not always properly selected by this strategy. We had to fine tune it manually. Maybe this will be made fixed at a reasonable value for all objects. We then manipulated the object with the hand. The color of the hand interferes with the object's color.
The results of the tests can be observed in the figures included in this file, for several objects: [1].
The conclusions are the following:
- Bad objects have skin-like colour, or are too dark, or have a lot of specular reflection.
- Good objects are these:
- A good v_min value for these good objects is 140.
Todo List
- automate camera initialization parameters (new XML with custom parameters, to be put in $ICUB_ROOT/app/iCubLisboa01)
- effectDetector: remove highgui dependency, send backprojected image to port (instead of cvCreateWindow), get rid of "v==255" debug window, check crashes with cvEllipse, add default_vmax in effectDetector.ini and code, ignore small holes
- compute ideal grasping point
- infer object height
- think how to filter objects that are not on the table (calibrate table boundaries by azymuth,elevation then remove objects outside range)
Final Demo Preparation at Sestri Levante
We had to retune a bit the camera and visual module parameters.
The best camera settings here are:
- Shutter 0.915
- Brightness 0
- Gain 0
- Red 0.5
- Blue 0.5
- Sat 0.6
The vMin parameter for the effectDetector has been set to 80.
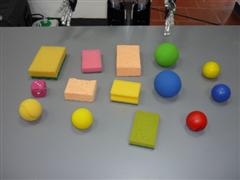
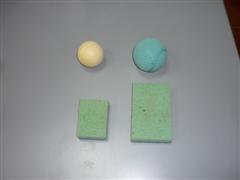
The black cloth has been removed for the sake of demonstrating the "robustness" of the demo. The table is gray greenish, so some objects are no longer well segmented. The remaining ones work well.


