ICub instructions/Archive
Note: these methods are obsolete and kept here for historic reference only. Most probably, you may ignore this page and go back to iCub instructions.
Useful things to archive
Desktop icons to launch the Application Manager and XMLs
Example: cameras.sh icon (to be placed in ~/Desktop/) contains:
2011 version
 #!/bin/bash
 source ~/.bash_env
 cd $ICUB_ROOT/app/$ICUB_ROBOTNAME/scripts
 manager.py cameras_320x240_setForTracking.xml
2010 version
 #!/bin/bash
 source ~/.bash_env
 cd $ICUB_ROOT/app/default/scripts
 ./manager.py cameras_320x240.xml
Note that Resource Finder searches for XMLs in $ICUB_ROOT/app/$ICUB_ROBOTNAME/scripts/ first, then in a number of other directories.
2019 archive
Starting YARP components
yarpserver and yarpruns (the former is a global, single-instance nameserver; the latter are various instances of network command listeners, one per each machine involved in the demos)
2015 archive
Face tracking
- Make sure that basic YARP components are running: summarized Cluster Manager instructions are here; detailed instructions are in section #Starting YARP components
- Make sure that iCubStartup (robotInterface) and cameras are running
- Optionally, start the facial expression driver
- Select the faceTracking_RightEye_NoHand panel (or the Left/Right Arm version); start modules and make connections
Bringing the iCub to external demos
Note: the iCubBrain chassis, which contains two servers used for computation (icubbrain1 - 10.10.1.41, icubbrain2 - 10.10.1.42) is normally in the ISR server room on the 6th floor. When we bring the iCub to external demos, it sits on top of the power supply units.
- Check that the two iCubBrain servers are on (if the demo is held at ISR then they are already on: ignore this step)
- If necessary, turn off other machines (such as portable servers during a demo outside ISR) and the UPS
Starting YARP components
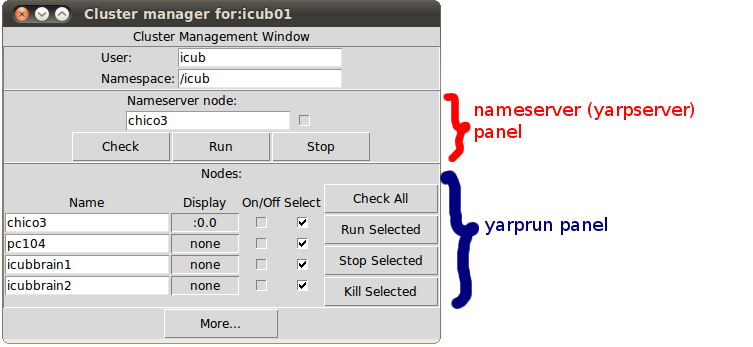
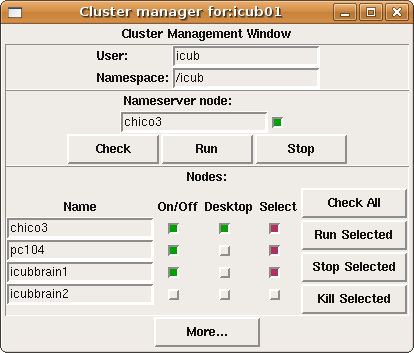
See Cluster Management in VisLab for background information about this GUI (not important for most users).
Do all the selected machines have their 'On/Off' switch green by now? If so, proceed to the next step. If not, click on 'Check All' and see if we have a green light from the pc104 at this point. You should see something similar to this, actually with all the required machines showing a green 'On' light:
2013 archive
Specific demos
Interactive Objects Learning Behavior
For this demo, you also need a Windows machine to run the RAD speech recognition module. The Toshiba Satellite laptop is already configured for this purpose.
In Linux:
yarp cleanto remove dead ports- make sure that no IOL module is running in the background:
yarp name listshould be empty, if not remove any IOL module running
Turn on the Windows machine. On startup, it will launch a command prompt with a yarprun listener.
Back to the Linux machine, in the yarpmanager IOL demo panel:
- refresh
- Run Application - wait for a bit to allow the network to start all modules; then do another refresh in order to see that all modules are running ok and all ports are green
- Connect Links - wait for a bit, then refresh to check that everything is connected
Finally, in the Windows machine, go to the InteractiveObjectsLearning.rad icon. Right-click it, select "Edit", then click the Build button and finally Run.
The grammar of recognized spoken sentences is located at $ICUB_ROOT/contrib/src/interactiveObjectsLearning/app/RAD/verbalInteraction.txt
2012 archive
Shutting off the robot
Software side
- Go to the (yellow) pc104 iCubInterface shell window and stop the program hitting ctrl+c, just once. Chico will thus move its limbs and head to a "parking" position. (If things don't quit gracefully, hit ctrl+c more times and be ready to hold Chico's chest since the head may fall to the front.)
- Optionally, shut down the pc104 gracefully by typing this in the yellow pc104 shell window:
sudo shutdown -h now
Other components
Cameras
- Double-click the cameras.sh icon on chico3 desktop and select 'Run'
- Run modules and connect
iCubInterface
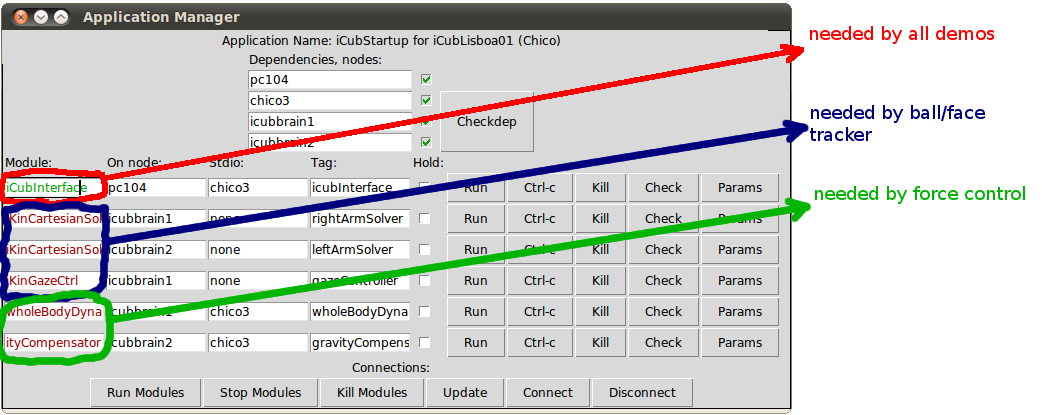
click on the iCubStartup.sh icon (formerly known as cartesian_solver.sh), running its modules. You should start at least the first module (iCubInterface, as shown in the following picture) and optionally the other modules, depending on your demo.
Cartesian Solvers, Gaze Control, wholeBodyDynamics
The iCubStartup window has a number of different modules that you can start. Normally, you do not need to run all of them. Only the iCubInterface part is necessary for all demos. The additional modules, depending on what you want to do, are reflected in this picture:
Facial expression driver
- Double-click the EMOTIONS1 icon on chico3 desktop and select 'Run'
- Finally, run modules and connect. It should look similar to this:
Skin GUI
- Double-click the skinGuiRightArm icon on chico3 desktop and select 'Run'
- Finally, run modules and connect.
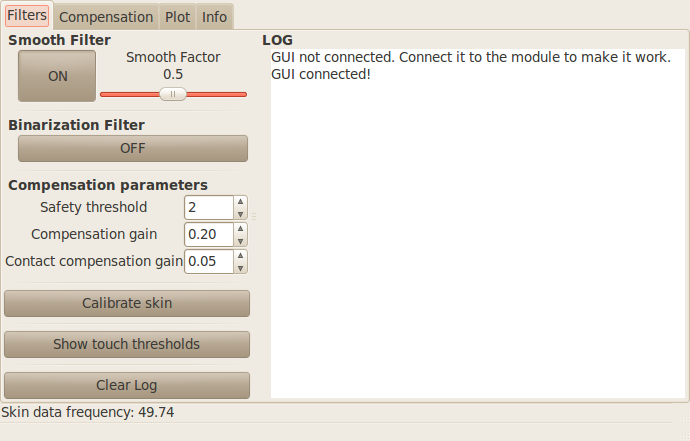
At this point, the driftPointGuiRight window should look like this:
and the iCubSkinGui window will display the fingertip/skin tactile sensors response:
See also: http://eris.liralab.it/viki/images/c/cd/SkinTutorial.pdf
Specific demos
Ball tracking and grasping (demoGrasp)
- iCubStartup.sh; start modules and make connections
- Run camerasSetForTracking.sh (not cameras.sh!) from the chico3 desktop icon; start modules and make connections
- Optionally, start the facial expression driver (EMOTIONS1 icon)
- Finally, run the demoGrasp.sh icon and use the Application Manager interface to start the modules and make the connections
Yoga demo
- Click on the yoga.sh icon and run the module
Facial expression demo
2011 archive
Specific demos
Ball tracking and reaching (demoReach)
This demo uses an old module compiled with some hacks, use the grasping demo instead.
- Make sure that basic YARP components are running: summarized Cluster Manager instructions are here; detailed instructions are in section #Starting YARP components
- Start iCubInterface on the pc104
- Run camerasSetForTracking.sh (not cameras.sh!) from the chico3 desktop icon; start modules and make connections
- Finally, run the demoReach_LeftHand.sh icon and use the Application Manager interface to start the modules and make the connections
Note that this demo launches the left eye camera with special parameter values:
 brightness 0
 sharpness 0.5
 white balance red 0.474      // you may need to lower this, depending on illumination
 white balance blue 0.648
 hue 0.482
 saturation 0.826
 gamma 0.400
 shutter 0.592
 gain 0.305
Ball tracking and grasping (demoGrasp)
- Run iKinGazeCtrl via command line on one of the iCubBrains.
Yoga demo
- On any machine, type:
iCubDemoY3 --config /app/demoy3/fullBody.txt
2010 archive
Starting YARP components
In case that (i.e., cluster_manager.sh) did not work, you can launch the program in a terminal:
  cd $ICUB_ROOT/app/default/scripts
  ./icub-cluster.py $ICUB_ROOT/app/$ICUB_ROBOTNAME/scripts/vislab-cluster.xml
Cameras
In case that (i.e., cameras.sh) did not work, type this inside a chico3 console:
  cd $ICUB_ROOT/app/default/scripts
  ./manager.py cameras_320x240.xml
That XML file is actually located in $ICUB_ROOT/app/$ICUB_ROBOTNAME/scripts/. Resource Finder gives priority to that directory, when $ICUB_ROBOTNAME is defined, as is the case for us (iCubLisboa01).
Alternatively, the second command can use the cameras_640x480.xml configuration, if you need a larger resolution.
Face expression driver
Open a pc104 console and type:
cd $ICUB_ROOT/app/faceExpressions/scripts
./emotions.sh $ICUB_ROOT/app/iCubLisboa01/conf
Facial expression demo
Run one of these two commands on any machine:
$ICUB_DIR/app/faceExpressions/scripts/cycle.sh
or
yarp rpc /icub/face/emotions/in
  set all hap      // full face happy
  set all sad      // full face sad
  set all ang      // full face angry
  set all neu      // full face neutral
  set mou sur      // mouth surprised
  set eli evi      // eyelids evil
  set leb shy      // left eyebrow shy
  set reb cun      // right eyebrow cunning
  set all ta1      // mouth talking position 1 (mouth closed)
  set all ta2      // mouth talking position 2 (mouth open)
iCubInterface
Alternatively, you can start it manually, typing one of these commands on a pc104 console (depending if any limb is broken):
| command | notes |
|---|---|
iCubInterface --from iCubInterfaceSimple.ini
|
without Cartesian interface - usually, we launch the program this way |
iCubInterface --from iCubInterfaceSimpleLeftArmDisabled.ini
|
without Cartesian interface, left arm disabled |
iCubInterface --from iCubInterfaceSimpleRightArmDisabled.ini
|
without Cartesian interface, right arm disabled |
iCubInterface
|
with Cartesian interface. Equivalent to --from iCubInterface.ini and --from iCubInterfaceCartesian.ini
|
iCubInterface --from iCubInterfaceCartesianLeftArmDisabled.ini
|
with Cartesian interface, left arm disabled |
iCubInterface --from iCubInterfaceCartesianRightArmDisabled.ini
|
with Cartesian interface, right arm disabled |
Keep the pc104 shell window open or minimize it; you will use it again when you quit iCubInterface. For instructions about quitting, refer to section #Shutting off the robot.
Innovation Days 2009 archive
In this page we explain how we took care of Chico during the Innovation Days 2009 exhibition that occurred in FIL (Lisbon International Fairgrounds) from 18 to 20 June 2009.
EuroNews talked about the event: http://web.archive.org/web/20090627064957/http://www.euronews.net/2009/06/23/innovation-days-in-lisbon/
Note: please refer to the iCub instructions article for up-to-date instructions about managing Chico. This page is obsolete!
Other components
Cameras
Open a chico3 console and type:
  cd $ICUB_ROOT/app/default/scripts
  ./cameras start
Sometimes we need to manually establish these connections in order for images to display:
  yarp connect /icub/cam/right /icub/view/right
  yarp connect /icub/cam/left /icub/view/left
To turn off the cameras:
./cameras stop
To change the size of images:
nano -w $ICUB_ROOT/app/$ICUB_ROBOTNAME/scripts/config.sh // TODO: check if we are really using $ICUB_ROBOTNAME and not default
Ball tracking and reaching demo, old method
- Run image rectifier on icubbrain2
  cd 13.FIL
  ./0.LEFT_320x240_image_rectifier.sh
- Set left camera colour parameters and run tracker
  cd 13.FIL
  ./1.LEFT320x240.iCub_set_parameters_of_framegrabber_REALISTIC.sh
  ./2.execute_the_tracker.sh
- Start a viewer on chico3
yarpview /viewer
- Start the facial expression driver on the pc104:
  cd $ICUB_DIR/app/faceExpressions/scripts
  ./emotions.sh $ICUB_DIR/app/iCubLisboa01/conf
- Run expression decision module
  cd 13.FIL
  ./3.execute_trackerExpressions.sh
- Run coordinate transformation module
  cd 13.FIL
  ./5.execute_LeftEyeToRoot.sh
- Run arm inverse kinematics module (this must run on icubbrain2)
iKinArmCtrl --onlyXYZ
- Connect all ports. Careful: the robot will start moving after this step!
  cd 13.FIL
  ./4.LEFT.iCub_connect_ports.sh
  ./6.connect_LeftEyeToRoot.sh
- [OPTIONAL, FOR DEBUG] Read the 3D position of the ball in the root reference frame (from any machine)
yarp read ... /icub/LeftEyeToRoot/ballPositionOut
Ball tracking and reaching demo, not so old method
This demo uses the left eye and the right arm of Chico. Assumption: left eye is running at a resolution of 320x240 pixels. Attention: make sure that the launcher uses icubbrain2 (32bit) or any of the 32-bit Cortexes for the kinematics computation.
These dependencies will be checked by the GUI:
- cameras are running
- iCubInterface is running
You need to set the color parameters of the camera using the framegrabberGui (left eye) to the following. Be careful, though, that the first time that you move any slider the action typically does not work. You have to move the slider first to a random position and then to the desired one.
 brightness 0
 sharpness 0.5
 white balance red 0.474
 white balance blue 0.648
 hue 0.482
 saturation 0.826
 gamma 0.400
 shutter 0.592
 gain 0.305
On chico3 type:
  cd $ICUB_ROOT/app/default/scripts
  ./manager.py $ICUB_ROOT/app/demoReach_IIT_ISR/scripts/isr/demoReach_IIT_ISR_RightHand.xml
Notes:
- the aforementioned XML file configures a system that moves the head and right arm of the robot. There exist also an XML file for moving juste the head and the left hand (
demoReach_IIT_ISR_LeftHand.xml), one which moves just the head (demoReach_IIT_ISR_NoHand.xml) and one which only starts the tracker, so it moves nothing (demoReach_IIT_ISR_JustTracker.xml). - you still need to set the camera parameters using framegrabberGui, we're trying to make that automatic.
Pausing the Ball Following demo
You can do this by disconnecting two ports (and connecting them again when you want to resume the demo).
Note that this will only stop the positions from being sent to the inverse kinematics module (and thus, almost always, it will stop the robot). The rest of the processes (e.g., the tracker) will keep running.
- Pause (from any machine)
yarp disconnect /icub/LeftEyeToRoot/ballPositionOut /iKinArmCtrl/right_arm/xd:i
- Resume (from any machine)
yarp connect /icub/LeftEyeToRoot/ballPositionOut /iKinArmCtrl/right_arm/xd:i
Quitting the Ball Following demo
- Disconnect all ports. Careful: this will stop the robot.
  cd 13.FIL
  ./7.disconnect_all.sh
- Quit/Kill the processes of the demo, in any order.
SIFT Object Detection and Tracking demo
Ignore this for now, as some libraries are not compiling. [controlGaze2 COMPILATION TO BE FIXED ON THE SERVERS - PROBLEMS WITH EGOSPHERELIB_LIBRARIES and PREDICTORS_LIBRARIES]
Assumptions:
- cameras are running
- iCubInterface is running at /icub/head (in order to read encoder values)
On any machine, run:
  $ICUB_ROOT/app/$ICUB_ROBOTNAME/scripts/controlGazeManual.sh
  $ICUB_ROOT/app/$ICUB_ROBOTNAME/scripts/attentionObjects/noEgoSetup/CalibBothStart.sh
On any machine (preferably one of the icubbrains, at this task is computationally heavy) type:
$ICUB_DIR/app/$ICUB_ROBOTNAME/scripts/attentionObjects/noEgoSetup/startSiftObjectRepresentation.sh
If you want to change the configuration, do:
nano -w $ICUB_DIR/app/$ICUB_ROBOTNAME/conf/icubEyes.ini
Attention system demo
Assumptions:
- /icub/cam/right is running at 320x240 pixels
- iCubInterface is running at /icub/head
Please note: we will run all the modules of this demo on icubbrain1 (64bit), unless specified differently.
Start the following module:
  cd $ICUB_ROOT/app/attentionDistributed/scripts
  ./camCalibRightManual.sh
Then:
  cd $ICUB_ROOT/app/attentionDistributed/scripts/
  ./salienceRightManual.sh
Then:
  cd $ICUB_ROOT/app/attentionDistributed/scripts
  ./egoSphereManual.sh
Then:
  cd $ICUB_ROOT/app/attentionDistributed/scripts
  ./attentionSelectionManual.sh
Then:
  cd $ICUB_ROOT/app/attentionDistributed/scripts/
  ./controlGazeManual.sh
And finally, but this time on chico3:
  cd $ICUB_ROOT/app/attentionDistributed/scripts
  ./appGui.sh
Press 'check all ports and connections', followed by pressing '>>' buttons (becoming green), in all the tabs of the GUI.
Now, in the 'Salience Right' tab of the GUI, press 'Initialize interface' and move the thresholds a bit (e.g., the 'intensity' one).

